miercuri, 22 decembrie 2010

Windows & Ubuntu - DualBoot

Introduction

This page describes how to set up your computer in order to dual boot Ubuntu and Windows.

Back Up Your Data

Although this may seem obvious, it is important to backup your data files to an external backup medium before attempting a dual-boot install (or any other hard drive manipulation), in case your hard drive becomes corrupted during the process. External hard drives, USB flash drives, and multiple DVDs or CDs are useful as external backup media.

Have a Windows recovery CD/DVD available

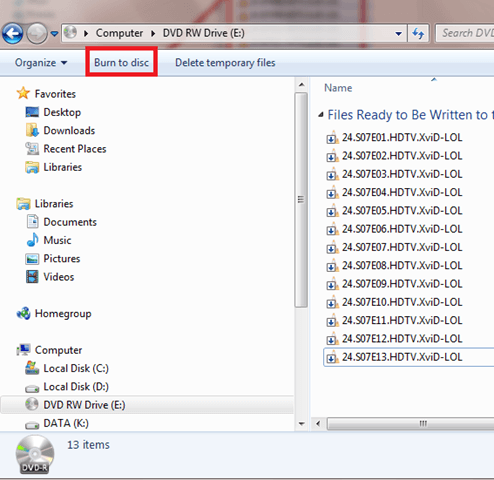
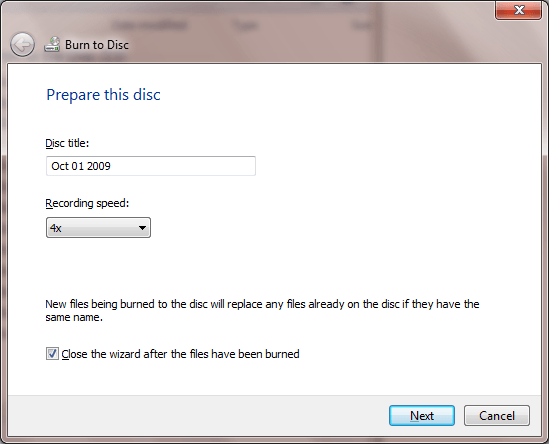
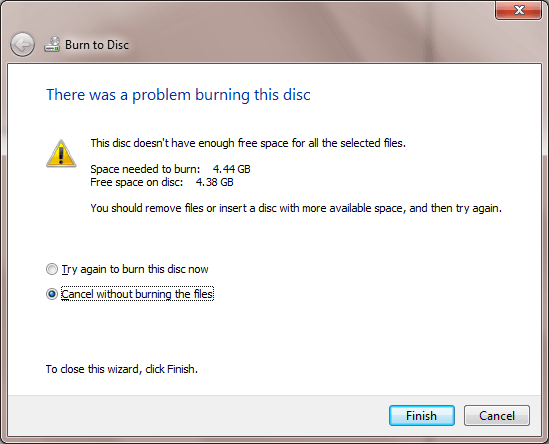
Many computer manufacturers that pre-install Windows provide a Windows recovery/re-installation CD or DVD with the computer. However, many companies no longer ship a physical disk but instead create a hidden partition on the hard drive in which the recovery-disk information is stored. A utility is then usually provided which allows the user to burn a recovery/re-installation CD or DVD from it. If you are buying a new computer and intent on dual-booting, make sure you have (or can make) a physical Windows recovery/re-installation CD or DVD. If neither a CD/DVD nor a recovery partition/burning utility is provided by your computer manufacturer, you may need to telephone your vendor and ask for a CD or DVD (to which you are normally entitled under the Windows EULA).
It is very important to have such a physical recovery/re-installation CD/DVD prior to changing your hard drive, in case your hard drive becomes corrupted in the process (and the recovery partition thereby becomes unavailable for use).
Once you have created a physical backup disk from a restore-image partition on the hard-drive, the restore-image partition can either be removed or left in place. Ubuntu can be installed with it intact without problems.

Install Ubuntu after Windows

In general, a Windows OS should be installed first, because its bootloader is very particular and because Windows installers tend to overwrite the entire hard drive (potentially wiping out any other data stored on it). If Windows isn't already installed, install it first. If you are able to partition the drive prior to installing Windows, leave space for Ubuntu during the initial partitioning process. Then you won't have to resize your NTFS partition to make room for Ubuntu later (saving a bit of time).
When a Windows installation already occupies the entire hard drive, its partition needs to be shrunk, creating free space for the Ubuntu partition. See How to Resize Windows Partitions to learn how to do this.
This can be done through Control Panel -> Administrative tools -> Computer Management -> Disk Management. You can then use the partition manager to shrink the partitions. As a side note, you can only create free space to the right of a partition.
If you have resized the windows 7 /vista partitions and cannot boot up windows, you can use the instructions fromWindowsRecovery to fix it. Once free space has been created on the hard drive, it is easy to install Ubuntu as the second operating system (and it is done automatically) from the Ubuntu LiveCD. Allow the Ubuntu LiveCD to install to "largest available free space" (if you have left unallocated free space), or manually into a partition that you have already created for Ubuntu.

Install Ubuntu

  • Download an Ubuntu LiveCD image (.iso) from Ubuntu Downloads and burn an Ubuntu LiveCD (see BurningIsoHowto).
  • Insert the LiveCD into your CD-ROM drive and reboot your PC.
  • If the computer does not boot from the CD (eg. Windows starts again instead), check your BIOS settings and adjust them so that booting from the CD is allowed.
  • Proceed with installation until you are asked this question: "How do you want to partition the disk ?".

Resizing Partitions Using the Ubuntu Installer

Automatic partition resizing

  • Choose the First Option (It should be something like: "Resize IDE1 master, partition #1 (hda1) and use freed space").
  • Specify the size of the new partition as a percentage of your entire hard disk.
  • Click on "Forward".

Manual partitioning

  • Choose "Manually edit partition table"
  • Listed will be your current partitions
  • Select the partition you want to resize and press Enter.
  • Select "Size:", press Enter.
  • Select Yes, press Enter.
  • Type in a new size in Gigabytes for your partition, it's recommended you free up AT LEAST 10 GB of free space for your Ubuntu install. Press Enter when happy with your changes. It may take some time to apply the changes.
  • Create a swap partition of at least your amount of RAM (if you don't know, 2000 MB is a good value).
  • Create a partition for your Ubuntu installation, at least 10 GB.
  • Select "Finish partitioning and write changes to disk".

Master Boot Record and Boot Manager

GNU/GRUB2 is the boot manager installed in Ubuntu by default. If you use the Alternate CD you can choose Lilo instead. GRUB2, GRUB and Lilo are good Open Source boot managers so the main parts of the boot loaders are installed inside Ubuntu. This means Ubuntu is independent and avoids any need for writing to other operating systems. To accomplish this, the only thing in your computer outside of Ubuntu that needs to be changed is a small code in the MBR (Master Boot Record) of the first hard disk. The MBR code is changed to point to the boot loader in Ubuntu. You will be presented with a list of operating systems and you can choose one to boot. If you do nothing Ubuntu will boot after a ten second countdown. If you select Windows then GRUB or Lilo will chain-load Windows for you at the Windows boot sector, which is the first sector of the Windows partition.
If you have a problem with changing the MBR code, you might prefer to just install the code for pointing to GRUB to the first sector of your Ubuntu partition instead. If you do that during the Ubuntu installation process, then Ubuntu won't boot until you configure some other boot manager to point to Ubuntu's boot sector. Windows Vista no longer utilizes boot.ini, ntdetect.com, and ntldr when booting. Instead, Vista stores all data for its new boot manager in a boot folder. Windows Vista ships with an command line utility called bcdedit.exe, which requires administrator credentials to use. You may want to read http://go.microsoft.com/fwlink/?LinkId=112156 about it.
Using a command line utility always has its learning curve, so a more productive and better job can be done with a free utility called EasyBCD, developed and mastered in during the times of Vista Beta already. EasyBCD is user friendly and many Vista users highly recommend EasyBCD.

luni, 20 decembrie 2010

Install Windows 7 From USB Stick

Installing windows is preety easy with an Windows7 Disc, and with a Optical Drive.
But what if you want to install Windows 7 on a netbook or other computer without an optical drive? Fortunately, you’re not out of luck, because Windows 7 (and Vista, for that matter) can be installed from a USB storage key. Not only does installing from a USB key remove the need for a DVD drive, the install time is also greatly reduced – we shaved off minutes from the total install time. Our step-by-step guide will have you rocking the new version of Windows in no time!

Time = 1 hour

What you need:
  • 4GB USB key
  • WinRAR
  • Windows 7
 Note: This guide will only work within Windows Vista or 7.

1.    Format Your USB Key 

Plug in your USB key and back up any existing data stored on it. You’ll need to format the key before you can make it a bootable device.

Open up a Command Prompt as an Administrator. You can do this by finding the cmd.exe in yoru Windows/System32 folder, right-clicking the executable, and selecting “Run as Administrator”. Alternatively, type CMD in the Start Menu search field and activate the Command Prompt using Ctrl + Shift + Enter.
You should be under c:\Windows\system32 (assuming your Windows partition is the C drive). Type “diskpart” in the command line to enter the Disk Partition command line tool, which lets you format and create partitions on active disks.
Type “list disk” to reveal a list of all your active disks, each of which is associated with a number. Make a note of which one is your USB key, based on the capacity. In our screenshot below, our USB drive is Disk 6 (8GB).
Next, type the following commands, one at a time:
Select Disk # (Where # is the number of your USB disk. We typed “Select Disk 6”)
Clean (removes any existing partitions from the USB disk, including any hidden sectors)
Create Partition Primary (Creates a new primary partition with default parameters)
Select Partition 1 (Focus on the newly created partition)
Active (Sets the in-focus partition to active, informing the disk firmware that this is a valid system partition)
Format FS=NTFS (Formats the partition with the NTFS file system. This may take several minutes to complete, depending on the size of your USB key.)
Assign (Gives the USB drive a Windows volume and next available drive letter, which you should write down. In our case, drive “L” was assigned.)
Exit (Quits the DiskPart tool)


2.    Turn the USB Key into a Bootable Device

Insert the Windows 7 install DVD into your drive, and view the files that it contains. Copy all of the files here to a folder on your Desktop. We put the disc contents in a folder named “Windows 7”
Go back to your command prompt, running it as an Administrator. Using the “CD” command, find your way to the folder where you extracted the ISO files. Your command line path should look something like “C:\Users\USERNAMEHERE\Desktop\Windows 7\”.
Type the following commands:
CD Boot (This gets you into the “boot” directory)
Bootsect.exe /nt60 L: (where ‘L’ is the drive letter assigned to your USB key from the previous step)

Bootsect infuses boot manager compatible code into your USB key to make it a bootable device.
IMPORTANT: If you’re currently running 32-bit Windows Vista or 7, Bootsect will only work if you use the files from the 32-bit Windows 7 install disc. The Bootsect executable from the 64-bit version will not run in 32-bit Vista.

3.    Load the USB Key Up with the Install Files

 
Copy all of the extracted ISO files into the USB drive. You don’t need to do this from the command prompt. Just drag and drop the files from the “Windows 7” folder into the drive using Windows Explorer.
Your USB key is now all ready to go! Plug it into your target system and make sure you enter the BIOS (typically with F2 or F12) to temporarily change the boot order to allow booting from the USB key before your primary hard drive or optical drive. On the next restart, your system should automatically begin speedily loading setup files off of the USB key and entering Windows 7 installation.

duminică, 19 decembrie 2010

Create home DVDs using Windows 7’s DVD Maker

Windows 7 by default comes with a DVD Maker software.  Home users will particularly like this tool since it lets them burn DVD movies using their own media like home made videos and digital photos.
The quickest way to make a DVD is to add pictures and videos in Windows DVD Maker, and then burn to a blank DVD. If you want to get creative, you can customize the DVD menu style and text before you burn the DVD.
To open DVD Maker, click the Start button and choose Windows DVD Maker:
image
The interface is Wizard-based and targets novice home users.  Advanced users might prefer a more complete software like Nero, but for simple DVD making needs, this one will do just fine.
image
You can add WMV movies to it (no support for AVI or MP4 which sucks!) and also pictures.  If you add a bunch of pictures they will appear as a slideshow folder.
image
You can see the amount of time remaining on your DVD project so you know how much space is still left.  You can also enter your own DVD title which by default contains the date when you open the program.
image
You can change the order of the media files that you enter using the up and down arrows.
image
You can also change the drive where you have a DVD burner.  It automatically detects the right drive even if you have more than one DVD drive.
image
The next window will let you preview your work before burning it.  You can change the menu styles and menu text.
image
image
After finalizing the menu text and previewing the DVD movie, click the Burn button to start burning the disc.
The software only provides basic DVD making capabilities.  If you want to do more advanced tasks like cropping or color correction, you may want to look for more higher end tools like Adobe Premier or Nero (which unfortunately is not yet working on Windows 7 as of this writing).
It also is poor when it comes to supported formats so you may need to convert your video files to WMV first before you can burn them.

sâmbătă, 18 decembrie 2010

Burn CD/DVD/BR with Windows7

Windows 7 comes with it’s own Explorer integrated CD/DVD burner.  We have shown you before how to create DVD movies using Windows 7 movie maker, but this time we will look at it’s capability to burn generic files.  Creating data discs in Windows 7 is very intuitive.
Pop-in a blank DVD or CD and it will automatically prompt you with the “burn a disc” window.  The default disc title appears as the current date and you will have two options to choose from – like a USB flash drive or with a CD/DVD player.
image
The “like a USB flash drive” option is the live file system format and is often more convenient because you can copy selected files immediately and as often as you want, just like you can with a USB stick. Alternatively, Live File System discs can’t be used in all computers or in all CD, DVD, or Blu-ray Disc player.
image
The “with a CD/DVD player” option is the master burning type which is more compatible with other computers and consumer electronic devices, such as CD players, DVD players, and Blu-ray Disc players. Choose which option is suitable for your need then click next.
To start adding files to the disc, drag the files and folders to the drive.  I usually watch the size of the files I am dragging to the disc to avoid “not enough space” problems during the actual burning process.  If your files are more than 700 MB and less than 4.7GB, get a blank DVD disc.  If you need to burn files more than 4.7Gb, you might need to get a Blu-ray disc which supports up to 50GB of total size.
image
A balloon reminder will show that you have a bunch of files waiting to be burned to a disc.  Click this balloon or the disc drive to begin the burning process.
image
Click the Burn to disc button to start burning.
image
It will prompt for the disc title and recording speed – I usually set the recording speed to the lowest speed to ensure the maximum quality of the burned data.
image
If your disc’s capacity is less than the total amount of space that you need to burn, delete a file or files to meet the capacity limit then click choose “try again to burn disc now”:
image
It will then start to burn the disc.  Do not eject the disc or turn off your computer while this is ongoing, otherwise you will corrupt the burning process.  In my Samsung drive, it takes about 18 minutes to burn a DVD-R in 4X speed.
image
I hope this guide helps you burn data discs easily in Windows 7.  It is not as robust as the commercial disc burning apps like Nero Burning ROM but for quick and basic disc burning, this does the job well.

vineri, 17 decembrie 2010

FULL HD Movies - How to make it work!

Everybody heared that an movie file cannot be played on a computer with windowx/linux without proper codecs. I have many friends that are calling and ask me how to open a file with *.X extension. Well, I don't know them all, but for those that I don't know I use the Google Search and simply write "open MKV file for example or CUE file" depends on the file format. And here is the part that I want to tell you about, because when I discovered the FULL HD movie files I remember that I really had a bad time making that work. Of course, now is easyer with a lot of new video players that have been released, BUT, not all of them are "system resource friendly " and those that are, if they're not configured well, you might not experience the really meaning of FULL HD (I personally include here the video quality and the sound.) Is ok if you have a stereo sound sistem, but for surround is really necesary that you configure the software for that. REMEMBER, the windows sound settings (for surround 5.1,etc) doesn't apply to the video rendering software. (except for WMP).
So, the easyest way to watch the FULL HD movies is to download the CCCPack (Combined Codec Comunity Pack) and this have all the codecs and video players that you need.
[Download CCCPack Here]

So, the video player that this pack will install is Windows Media Player Classic - Homecinema Edition, and I personally manage to configure it for FULL HD and Surround like in Cinemas :)

ENJOY!

joi, 16 decembrie 2010

Optimize your computer for peak performance


Our personal computers are like fine automobiles—they need preventive maintenance to run efficiently and to avoid major breakdowns.
Optimize your computer for peak performance
The following tips can help improve your computer's performance. These examples are for Windows 7, Windows Vista, and Windows XP. However, you'll find that these tips work for all versions of the Windows operating system.
By the way, it is not possible for you to blow up your computer or your files with any of these procedures. These tasks use utilities provided within the Windows operating system to help you to achieve the best system performance. This article does not address tinkering with the registry files.

Clean up disk errors

Run once a week

Whenever a program crashes or you experience some power outage, your computer may create errors on its hard disk. Over time, the errors can slow your computer. Luckily, the Windows operating system includes a Disk Check program to check and clean any errors on your computer and to help keep it running smoothly.

To run Disk Check:


Windows 7 and Windows Vista users:


  1. Click the Start button Start icon, and then click Computer.
  2. Right-click the hard disk drive that you want to check, and then clickProperties.
  3. Click the Tools tab, and then, under Error-checking, click Check now.
    To automatically repair problems with files and folders that the scan detects, select Automatically fix file system errors. Otherwise, the disk check will simply report problems but not fix them.
    To perform a thorough disk check, select Scan for and attempt recovery of bad sectors. This scan attempts to find and repair physical errors on the hard disk itself, and it can take much longer to complete.
    To check for both file errors and physical errors, select both Automatically fix file system errors and Scan for and attempt recovery of bad sectors.
  4. Click Start.
Depending upon the size of your hard disk, this may take several minutes. For best results, don't use your computer for any other tasks while it's checking for errors.
Note: If you select Automatically fix file system errors for a disk that is in use, you'll be prompted to reschedule the disk check for the next time you restart your computer.

To run Disk Check: Windows XP users:


  1. In the Start menu, click My Computer.
  2. In the My Computer dialog box, right-click the drive you wish to check for errors (for most of us, this is the C: drive, unless you have multiple drives on your computer), and then click Properties.
  3. In the Properties dialog box, click the Tools tab. In the Error-Checkingsection, click the Check now… button. A Check Disk dialog box displays, as seen here.
    Image of the Check Local Disk (C:) dialog box
    The Check Disk dialog box
  4. In the Check Disk dialog box, select all the check boxes. Click Start.
  5. You will see a message box that says you can schedule the disk check to start the next time you restart your computer. Click Yes. The next time you restart your computer, it will automatically run through a disk check before displaying your login screen. After the disk check finishes, Windows will automatically bring you to your login screen.
    Note: Check Disk can take more than an hour to check and clean errors on your computer.

Remove temporary files

Run once a week

Your computer can pick up and store temporary files when you're looking at webpages and even when you're working on files in programs, such as Microsoft Word. Over time, these files will slow your computer's performance. You can use the Windows Disk Cleanup screen to rid your computer of these deadbeat files.

To run Disk Cleanup:


Windows 7 users:


  1. In the Start menu, click All Programs, click Accessories, click System Tools, and then click Disk Cleanup. Disk Cleanup will automatically begin to scan your disk for files you can delete.
    Note: If the Disk Cleanup: Drive Selection dialog box appears, select the hard disk drive that you want to clean up, and then click OK.
  2. Click the Disk Cleanup tab, and then select the check boxes for the files you want to delete.
  3. When you finish selecting the files you want to delete, click OK, and then, to confirm the operation, click Delete files. Disk Cleanup then removes all unnecessary files from your computer.
The More Options tab is available when you choose to clean files from all users on the computer.

Windows Vista users:


  1. In the Start menu, click All Programs, click Accessories, click System Tools, and then click Disk Cleanup.
  2. In the Disk Cleanup Options dialog box, choose whether you want to clean up your own files only or all of the files on the computer.
  3. If the Disk Cleanup: Drive Selection dialog box appears, select the hard disk drive that you want to clean up, and then click OK.
  4. Click the Disk Cleanup tab, and then select the check boxes for the files you want to delete.
  5. When you finish selecting the files you want to delete, click OK, and then, to confirm the operation, click Delete files. Disk Cleanup then removes all unnecessary files from your computer. This may take awhile.
The More Options tab is available when you choose to clean files from all users on the computer.

Windows XP users:


  1. In the Start menu, click My Computer.
  2. In the My Computer dialog box, right-click the drive you wish to check for errors (for most of us, this is the C: drive, unless you have multiple drives on your computer), and then click Properties.
  3. In the Properties dialog box, click Disk Cleanup.
     Disk Cleanup button in the Local Disk Properties dialog box
    The Disk Cleanup button in the Local Disk Properties dialog box
  4. Disk Cleanup will calculate how much space you can free up on your hard drive. After its scan, the Disk Cleanup dialog box reports a list of files that you can remove from your computer, as shown. This scan can take a while depending on how many files you have lying around on your computer.
    Disk Cleanup dialog box, listing possible files to be deleted
    Choose files to delete in Disk Cleanup
  5. After the scan is complete, in the Disk Cleanup dialog box, click View Filesto see what Disk Cleanup will discard (if you accept the suggestions). You can select and deselect check boxes to define what you wish to keep or discard. When you're ready, click OK.
  6. You can also select the More Options tab within the Disk Cleanup screen to look for software programs you don't use much anymore. You then have the choice to remove these unused programs.

Rearrange your data

Run once a month

Don't be shocked, but your computer can get sloppy. It often breaks files side by side to increase the speed of access and retrieval. However, as files are updated, your computer saves these updates on the largest space available on the hard drive, often found far away from the other adjacent sectors of the file.
The result: a fragmented file. Fragmented files cause slower performance. This is because your computer must now search for all of the file's parts. In other words, your computer knows where all the pieces are, but putting them back together in the correct order—when you need them—can slow your computer down.
Windows includes a Disk Defragmenter program to piece all your files back together again (if only Humpty Dumpty had been so lucky) and make them available to open more quickly.

To run the Disk Defragmenter:

  1. In the Start menu, click My Computer.
  2. In the My Computer dialog box, right-click the drive you wish to check for errors (for most of us this is the C: drive, unless you have multiple drives on your computer), and then click Properties.
  3. In the Properties dialog box, click the Tools tab, and then in the Defragmentation section, click Defragment Now….
    The Defragment Now button in the Tools tab
    The Defragment Now button in the Tools tab
  4. In the Disk Defragmenter dialog box, select the Volume (most likely your Local Disk C:) at the top of the screen, and then click Analyze (disk).
  5. After analyzing your computer, the Disk Defragmenter displays a message stating whether you should defragment your computer. Press Defragment (disk) to clean up your computer if necessary. The Disk Defragmenter will reorganize files by placing them together and sorting them by program and size, as shown here.
    Disk defragmentation progress bars
    Disk defragmentation in progress

Make Internet Explorer run faster

The web is a sparkling achievement of modern society. It's everywhere—from the home to the classroom. We use it to communicate, to work, to play—even to waste time, when there's not a lot to do.
Yet there's nothing more frustrating than having this technical marvel at our fingertips 24 hours a day, 7 days a week, only to wait as our computers access the Internet at a crawling pace. Thankfully, Windows Internet Explorer provides some useful options for quicker web surfing. Let's look at these options now.
Reduce the size of your webpage history
Internet Explorer stores visited webpages to your computer, organizing them within a page history by day. Although it's useful to keep a couple days of web history within your computer, there's no need to store more than a week's worth. Any more than that and you're collecting webpages that will slow down your computer's performance.

To reduce your webpage history:

  1. In Internet Explorer, on the Tools menu, click Internet Options.
    In the General tab, under Browsing history, click Settings.
    Image of the Internet Options dialog box
  2. Under History, find the Days to keep pages in history: box. In the box, type 1. Click OK.
    Image of the Internet Options dialog box
    Reduce the number of days to keep pages in history.
    Temporary Internet Files and History Settings dialog box, with the Automatically button selected
    Days to keep pages in browser history.
Don't save encrypted webpages
Encrypted webpages ask for usernames and passwords. These pages scramble information to prevent the reading of this sensitive information. You can define Internet Explorer to not save these types of pages. You'll free up space by saving fewer files to your computer, in addition to keeping secure information off of your computer.

To not save encrypted webpages:

  1. In Internet Explorer, on the Tools menu, click Internet Options.
  2. In the Internet Options dialog box, click the Advanced tab.
  3. In the Settings section, scroll down to the Security section. Select the Do not save encrypted pages to disk option, check box, as shown here. Click OK.
    Internet Options dialog box with the Do not save encrypted pages to disk check box selected
    The selected Do not save encrypted pages check box

Automate Windows Update

Configure once

Microsoft works constantly to release updates to Windows and other Microsoft products, including Microsoft Office. With Windows Update, you can find and install all these updates—not just the critical ones. Often, these updates can improve your computer's performance.
You can make life easier by automating Windows Update so that your computer downloads and installs all the updates without you having to worry about them.

© 2010 Microsoft
Best Web Directory